NEONengine Devlog 2 - Drawing Text
Hello world!
Before porting my text-rending code, I looked at what ACE could do for me out of the box. Out of the box, ACE comes with a tool to create a monochrome font (1BPP) to be used when rendering text. The neat thing about this is that you can change the color of the text at runtime. Unfortunately, it only supports monochrome fonts, while NEONnoir uses a multi-colored font.
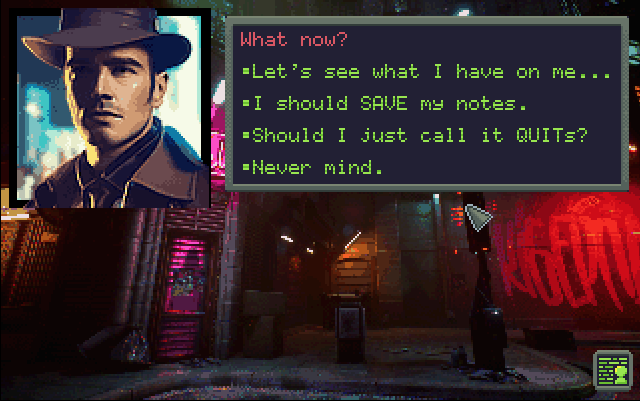
An example of NEONnoir's dialogue system
A screenshot of NEONnoir’s dialogue system shows that the green text is two shades of green, creating a CRT-like effect. However, it also shows the speaker’s text is one solid color, red.
I could abandon ACE’s font rendering routines and do what I did in NEONnoir: blit each character to a buffer and then blit that buffer to the screen, or forget about the CRT effect.
While I like the CRT effect, I can live without it since it’s already not consistent with the other text in the dialogue, and it opens up the possibility for more colorful text.
What do I need to build, then?
ACE can render text using a font, giving you a bitmap that you must then blit on the screen. It has options for left, center, or right aligning the bitmap, which works for one line of text. We’ll have to extend its capabilities to achieve parity with NEONnoir’s text routines.
The features we need are:
- Auto-wrapping text to a column count.
- Justify left, center, and right.
- Optionally center text vertically
- Optionally print inside a frame drawn with a nine-patch
Auto Wrapping
The NEONnoir Editor (gee, I’m going to have to give it a new name soon since it’ll outlive the original game) preprocesses all the text and, for each word in a sentence, it outputs the index in the string where it starts and its length as two 16-bit integers. I would then use this to quickly determine where the string should break and how many lines it would be, which was necessary for drawing the frame and aligning it vertically.
Text Justification
Once I knew how long each line would be, I could easily offset the rendering of the first character depending on the justification: zero for left, the maximum line width minus the line width for right, and half of that for center.
With ACE, it’s a little different. Rather than offsetting the text rendering, we offset the blitting of that line of text.
Putting Text in a Frame
This is almost entirely the same. Once we know how many lines the text is, we know how big to draw the frame. We then draw it on a scratch bitmap.
Vertical Alignment
This is the easiest of them all. If we know how big the bitmap containing the text and frame is, we make a simple calculation to center it vertically.
Putting it all together
Using the same principle in ACE, our steps should look something like this:
- Figure out the line break for each line, gathering the line count.
- Create a 1-bit-per-pixel bitmap large enough for the text.
- For each line, render it, the blit the resulting bitmap on our text bitmap, considering and offset for text justification.
- If needed, create a bitmap the correct size for the frame and render the nine-patch to it.
- Blit the text bitmap into the frame bitmap.
- Blit the frame bitmap onto the screen at the given coordinates, considering an offset for vertical alignment as needed.
Not too bad.
Next Steps
Since we’ll need the strings and array of word sizes, I’ll have to start somewhere else completely: reading the string and word tables. Post-launch, I moved the strings and word tables out of the NEONnoir data file to make it possible to localize the game. This means that I only have to read this much simpler file for now.
Next time I’ll talk about reading this file and defining an API for the text rendering.
See you next game!