NEONnoir Release
When I first started thinking about the Amiga Blitz Basic Jam , I knew I wanted to make a cyberpunk game. Having just finished the Dungeon Crawler Jam 2022, I was in the mood to make a dungeon crawler with point-and-click adventure elements in the vein of Horror Soft’s WaxWorks.
This was my first time developing for the Amiga and the first time touching Blitz Basic 2, as I started to understand the limitations of the language and hardware – but more importantly, my own limitations, I decided to drop the dungeon crawling aspect and decided to focus on making the game a first person point-and-click like Myst.
About two months into this five month jam, I ran up against another technological wall which made it very difficult to implement complex inventory puzzles, so I ended up tweaking the idea a little and thus the point-and-click adventure/visual novel that became NEONnoir had finally achieved its final form.
Since I had such time constraints, you’ll find that most decision in the development of this game were born out of the question “What systems can I reuse for another purpose.” In some ways, I think this has added to the charm of the game – I really like that the in-game menu is Blake talking to himself, for example.
In order to make this game, I had to develop the engine that runs it in Blitz Basic and a comprehensive toolset to actually make the game. I’ll discuss both of these efforts and how they came together. I’ll also touch on the art and music.
The Data
While I could have hard coded every screen, every interaction, and every line of dialogue into the Blitz Basic source, this would have been disastrous. Making changes to the game would be absolute insanity. This game (like virtually of them in this genre) had to be data driven. Therefore I needed a way to both write the data and do something with it.
To understand how the engine works, we need to understand what data it’s working with, so I’ll try to give a good idea of how it all goes together.
The editor spits out a “NEON” file. This is a binary files that is divided in “chunks”, each with their own header, not unlike how other container formats work (like IFF/ILBM, the most commonly used image format on the Amiga). So there’s a header chunk, a chunk that contains all the location, one for all the scenes, one for all the regions, strings, bytecode, etc. However, my engine is not flexible. It expects all the chunks in their specific order to be in the NEON file. I could have been more flexible about it, but at the time it would have been a waste of effort.
So why break them in chunks to begin with? It was so it was easy for me to look at the file in a hex editor to make sure everything was right when I would invariably find issues with either saving or loading.
The two most important structures are Locations and Dialogues as everything in the game is driven by those two. In order to understand them, we’ll have to start from the bottom and build our way up.
Scenes and Regions
A scene is an image that contains areas that you can click for something to happen. For example, the Scene outside of the Alleycat defines the background image to show, and every region that the user can interact with, such as the exits to Takeshi’s and the Empty Lot, the door to the Alleycat, and the sign over the entrance.
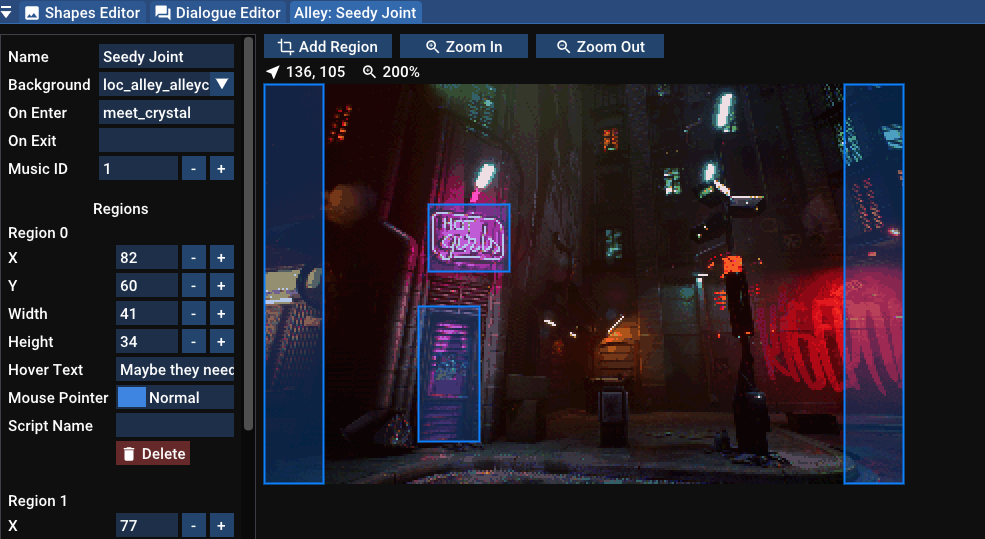
Entrance to the Alleycat scene and the regions as seen in the game editor
When the user enters a scene, there is a optional script that can be triggered, however I’ll touch on the custom scripting language a little later.
The regions are just rectangular areas that define a custom mouse pointer and name that displays when hovered over and an optional script to trigger if clicked.
Locations
Everything around NEONnoir revolves around locations, even the title screen is a location!
Locations are collections of screens. For example, all the scenes involving the alley way are part of the same location. All the scenes inside the Alleycat are their own location, etc.
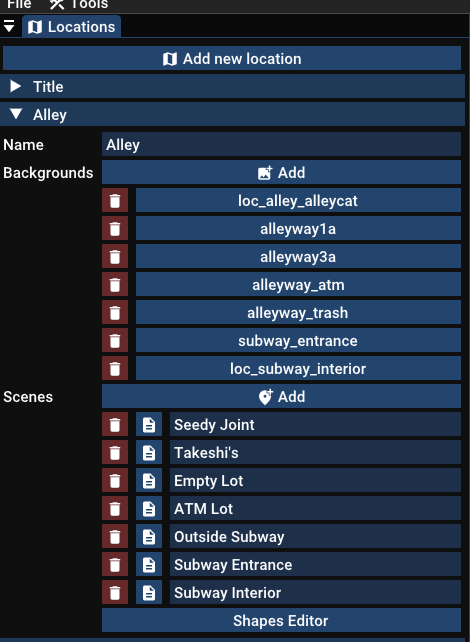
The location editor showing all the scenes in the Alley
Why bother with locations? Mostly for memory concerns. Each image for each scene is 64,000 bytes (320x200 bytes). Loading over a dozen of them would quickly get us into trouble. However, I wanted scenes that were near each other to be quick and snappy, rather than having to have to load every time you moved somewhere. Locations was my compromise to that.
Other than scenes, each location has a “shapes” file that is loaded with Blitz Basic’s LoadShapes command which defines every character portrait that could be used in that location. Blake is always present since his portrait is used for the main menu.
Dialogues, Pages, and Choices
The other important structure was the Dialogues and the Dialogue system. Just like locations pulling double duty for the title screen, dialogues also pull double duty by also being used as the main menu in the game and map system.
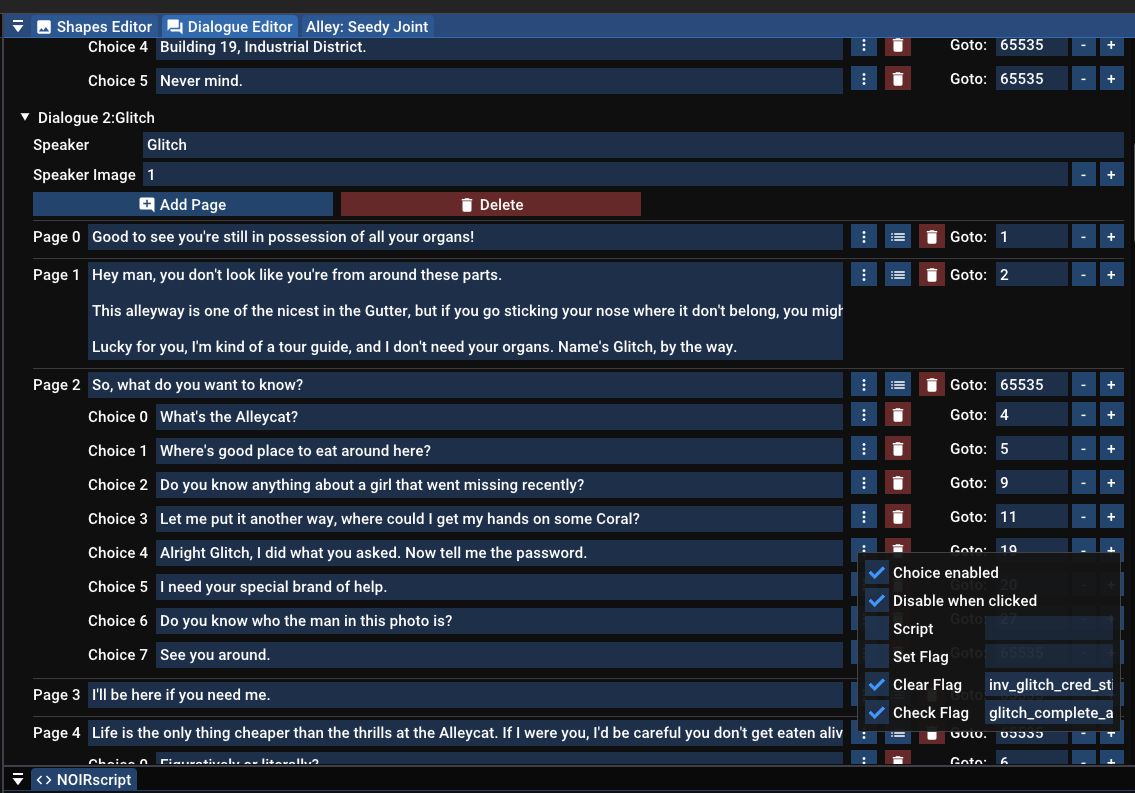
A page of dialogue with Glitch, showing the conditions for it to be rendered
A dialogue is a conversation between Blake and one other person. For each dialogue, we define a speaker ID (whose portrait is in the shapes file mentioned above). Each line of dialogue is called a Page an each page has a number of Choices that the user can select.
Both Pages and Choices can be enabled or disabled globally. They can query the game’s flags to determine if they should show (for example, only show “Show the photo of Danni” if the has_danni_photo flag is set).
Going through a page or selecting a choice can set or clear a flag. Clicking on a choice could trigger a script as well. This is how I do the in-game menu: when you click on the choice “I should SAVE my notes”, it calls a script that saves the game.
One severe limitation to the dialogue system is that it doesn’t allow you to change the speaker’s image. This make it impossible to have a conversation with multiple people. The more astute of you may have noticed that in NEONnoir there are many dialogues involving more than two people, how did I do that? I cheated: I have multiple dialogues defined that run one after the other. This means that there are dialogues that have only one page and no choices. It makes it really hard to change dialogues, but it was the quickest way for me to deal with that (self imposed) limitation.
NOIRscript and Bytecode
As I’ve alluded above, the game has a scripting language built in that I very creatively called NOIRscript. The first question is “Why bother?”
Since the game is fully data driven, it would be impossible to have game-specific actions trigger hard-coded Blitz Basic code. The only way to make the game extensible, would be for me to create my own script that gets interpreted in the Blitz engine.
The most difficult part was to create a program that would interpret my script and convert it to bytecode. Fortunately Robert Nystrom’s Crafting Interpreters book demystified that process. I decided to make things easier for me still and my language is basically a pseudo assembly language which would be dead simple to convert to the equivalent bytecode.

A code snippet of NOIRscript
On the Blitz side, my “virtual machine” is as dumb as it can be. There is only a program counter and one register and that contains a flag value. The rest of it is a big switch-statement that check the current memory value and if it matches with an instruction id, it executes the appropriate Blitz code.
Text Handling
As text is a huge part of the game, I needed to make sure that I had the level of flexibility to just put a string of text on the screen and know that it would flow appropriately.
Originally I entertained the notion that I would break the text myself and gave up after the first string. It was time to make my text rendering line-break automatically.
Figuring out where to break the sentence is not super hard. Naively, you blit each character until you get to maximum length of your line, then move the X,Y position of the next character to the new line. Unfortunately this will usually cut words in half, which is not what we want. We have to figure out if the next word fits first. It it does, blit the the word and continue. If it doesn’t, then to the next line you go. This requires us to know where the word ends, which requires us to figure out the length of each word, each time it’s drawn.
Naturally, I over engineered this. One of the chunks written by the editor is a list of indices to the start of words and word lengths for every string. I use that pre-computed data when detecting the line break. It’s faster than calculating it each time, but the code is a bit more complex for it.
Another complication is that each Page is inside a rectangle drawn as a 9-patch. This made sure that the UI is tight around the text. It looks really nice, but added a lot more work and complexity when drawing text then if I had a statically sized box of text.
Writing this, I can think of a few ways to optimize this code, but in the heat of the moment, it’s hard to justify changing something that works well enough considering the time you’d be spending doing it and the potential time you could waste if you broke something.
Post-jam goals, right?
The Editor
I had considered writing the game’s editor as an Amiga application, then I came to my senses and decided to write it for Windows. I’d been itching to write more C++ and so I was looking for a suitable framework. Unhappy with everything, I decided to go with Dear Imgui. It’s not perfect and slowed down as my project got larger (almost certainly my fault as I was learning ImGui along the way), and your UI code and business logic get coupled so hard they might as be considered welded together. But it worked and it was fun to use.
The Editor is pretty simple, it consists of several “windows”:
- Location Editor
- Scene Editor
- Dialog Editor
- Shapes Editor: Lets you import images and convert sections of them to a “shapes” file
- Script Editor: Uses ImGuiColorTextEdit which is amazing and allowed me to highlight sections of code that didn’t compile.
The Editor can also spawn the following tools:
- Palette Injector: Given a source palette, it injects it into another palettized image, pushing the colors of the destination image forward and updating the pixel data so that the image doesn’t change
- Image Converter: Converts a palettized BMP file to an ILMB/IFF file and lets you crush the palette.
- Shapes Editor: like the one above but standalone. I used it to slice my font image into individual character shapes
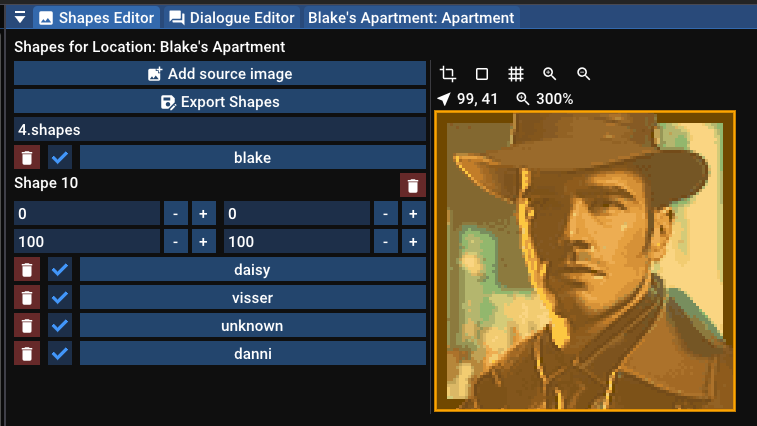
Shape editor turning Blake's portrait into a shape
The editor is not that user friendly and you need to know what you’re doing. However, I’d love to to slowly improve it so that people can use it to make their own games.
It’s no Unreal or Unity, but it gets the job done.
The Engine
Leaving the best for last. The heart of the game, and the whole point of the jam, is the Blitz Basic code. I’m not going to go through the codebase since everything I’ve written up to now should explains the codebase somewhat. Instead I’ll focus on what it’s like to write Blitz Basic code in 2022.
It’s not great.
Coming from the comforts of modern IDEs and debuggers, going back to a system from the 80s and 90s is a bit of a culture shock. There is a built in debugger with Blitz Basic, but it has a lot of limitations:
- You have to use STOP statement in your code in order to add breakpoints
- Stepping through code is really annoying if you’re in graphics mode as the system switches back and forth every frame
- Stepping inside “XINCLUDEd” files doesn’t work well in Blitz Basic 2, though it works better in AmiBlitz 3
- The placement of function in the source file is important. You can’t reference functions defined beyond the current line.
- Fixed in AmiBlitz 3 but a problem is BB2 is the lack of a strict mode. Did you make a typo in a variable or forget to use a SHARED statement in bring a global variable into your function? Congratulations, you have a brand new variable. Not all is lost though. Using Visual Studio Code with the Amiga Blitz Basic 2 Extension made life a lot easier. I got around the XINCLUDE issues by having a build step in my environment that concatenated all of my Blitz Basic source files into one uber file, making it easier to step through the code.
By far the most useful thing was a snippet of code from Daedalus2097 that lets me output values to the WinUAE log viewer rather than relying on print statements in my code. It made such a huge difference. And I don’t want to forget to mention the dozens of hours of Blitz Basic tutorial videos he made just for the jam.
Art and Music
Engines and tools are nice and all, but they don’t mean anything unless you have art and music to make the game come alive.
The music was created by Matías Sosa who was amazing to work with. I would work with him again in a heartbeat.
The astute among you would have noticed no sound effects in the game… this is because I ran out time. Something for me to add later, once the Jam judging period is over.
The art was made by a combination of loading up Cyberpunk assets in the Unreal Engine and rending out the screenshot and spamming the MidJourney AI. Once I got images that were close to what I wanted, I’d bring them into photoshop where I could change things around to make them exactly what I wanted, color match them, resize, and palettize the images so they could be displayed. I used my editor to convert the images to the Amiga friendly ILBM/IFF format.
Even though Midjourney could generate a face, it could not pose a body or change expressions. For that, my lovely wife agreed to do the pixel art needed to create the people based on their portrait and put them on the background in the scenes.
The combinations of these processes really sped up content creation and made it possible to create as long (I know the game is short :D) a game as I have.
Finally done! If there is interest I can do a deep dive on individual sections in the future.
Once again, I want to thank everyone in the Amiga Blitz Basic Game Jam Discord who have helped me and inspired me to finish my most ambitious project ever. You all all the real MVPs.